Controlling the Built-In LED on ESP32 (Lolin C3 Mini) using VSCode and PlatformIO
The Lolin C3 Mini is a small but powerful board based on the ESP32 chip, known for its Wi-Fi and Bluetooth features, making it great for IoT projects. This board is versatile, with features similar to Arduino boards:
- Arduino-like hardware I/O: Easy to connect with different sensors and devices.
- Event-driven API: Ideal for Wi-Fi or Bluetooth tasks.
- Rich GPIOs Setup: Has many pins supporting features like PWM, I2C, SPI, 1-Wire, and ADC.
- Network Features: Works as both a Wi-Fi access point and station, can run a web server, and connect online to send or receive data.
- Cost-effective for IoT: An affordable option for creating online devices.
The ESP32 Lolin C3 Mini is becoming popular for those who used to work with the ESP8266 and Arduino but are now moving to this more powerful and flexible ESP32 board. The programming basics are similar, but the ESP32 extra features mean you can do more with it.
This guide shows how to use VSCode with PlatformIO to program the Lolin C3 Mini. This setup is modern, complete, and good for all skill levels. We will go through setting up your tools, writing code, and using Sensora Cloud to control the board's built-in LED. This is a start to exploring the many possibilities with the Lolin C3 Mini in IoT projects.
Requirements
- Make sure you have installed CH340 Driver on your machine. If not, please follow this link: CH340 Drivers
- ESP32 only supports 2.4GHz frequency band, make sure WiFi router supports that.
Install PlatformIO and setup project
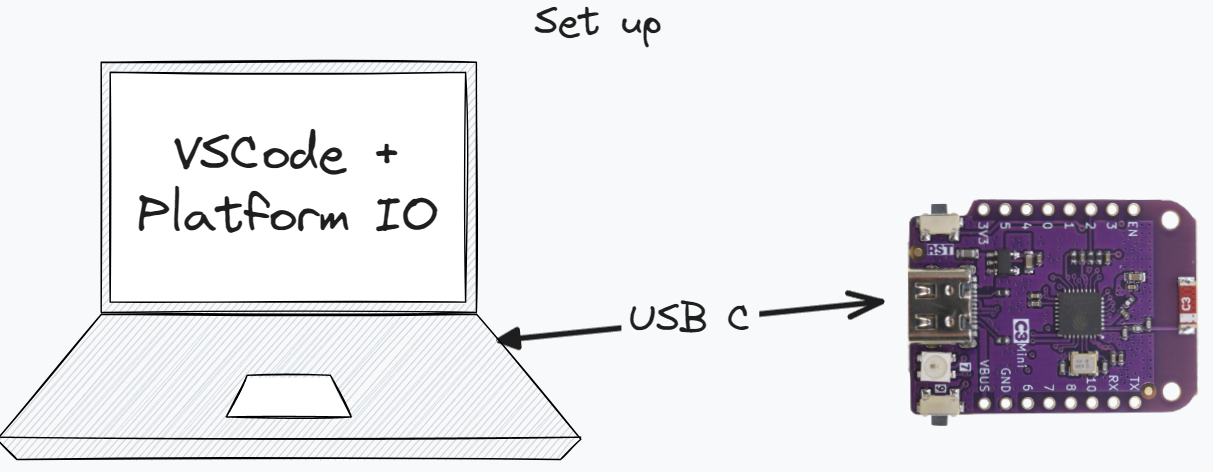
First, we need to prepare our programming tools. This starts with installing Visual Studio Code and the PlatformIO extension. VSCode offers a user-friendly interface and powerful features that are perfect for developers:
- Download and Install VSCode: You can find the software on the Visual Studio Code website. Follow the instructions there to install it on your computer.
- Install PlatformIO: After opening VSCode, go to the Extensions menu and search for "PlatformIO IDE". This extension is crucial as it provides all the necessary tools for programming devices like the ESP32.
Setup a new project
Once our tools are ready, we can start setting up our project:
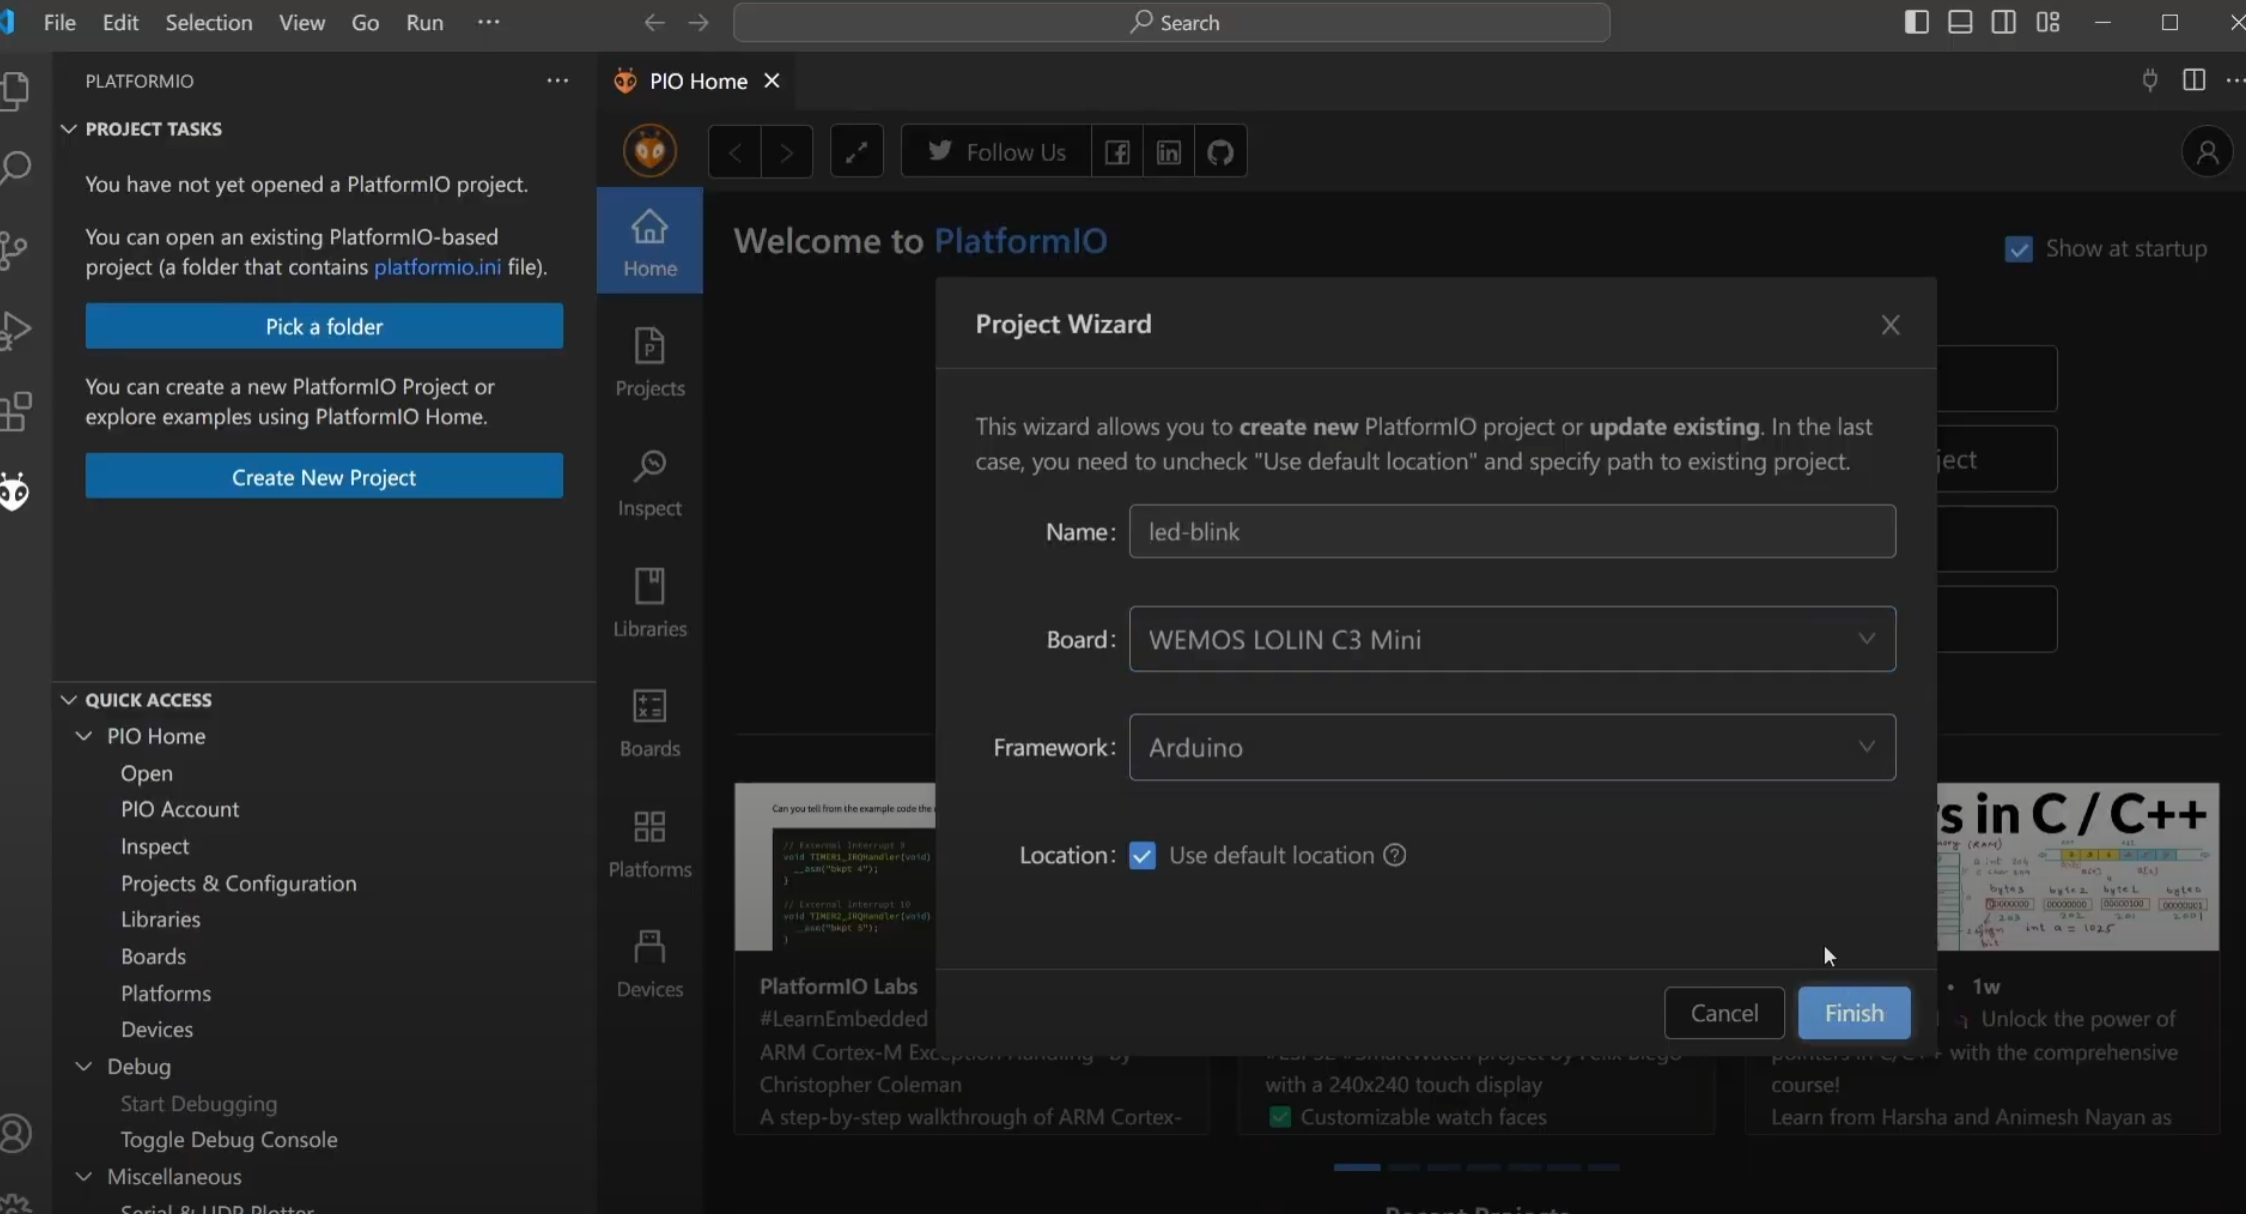
- Launch PlatformIO: From the VSCode sidebar, click on the PIO Home and select "Create New Project".
- Project Configuration:
- Name: Choose a name that reflects the purpose of your project.
- Board: Look for and select 'WEMOS LOLIN C3 Mini'.
- Framework: Select 'Arduino' because it’s user-friendly and widely used.
Next step is to configure Sensora library so you can control the device from the cloud
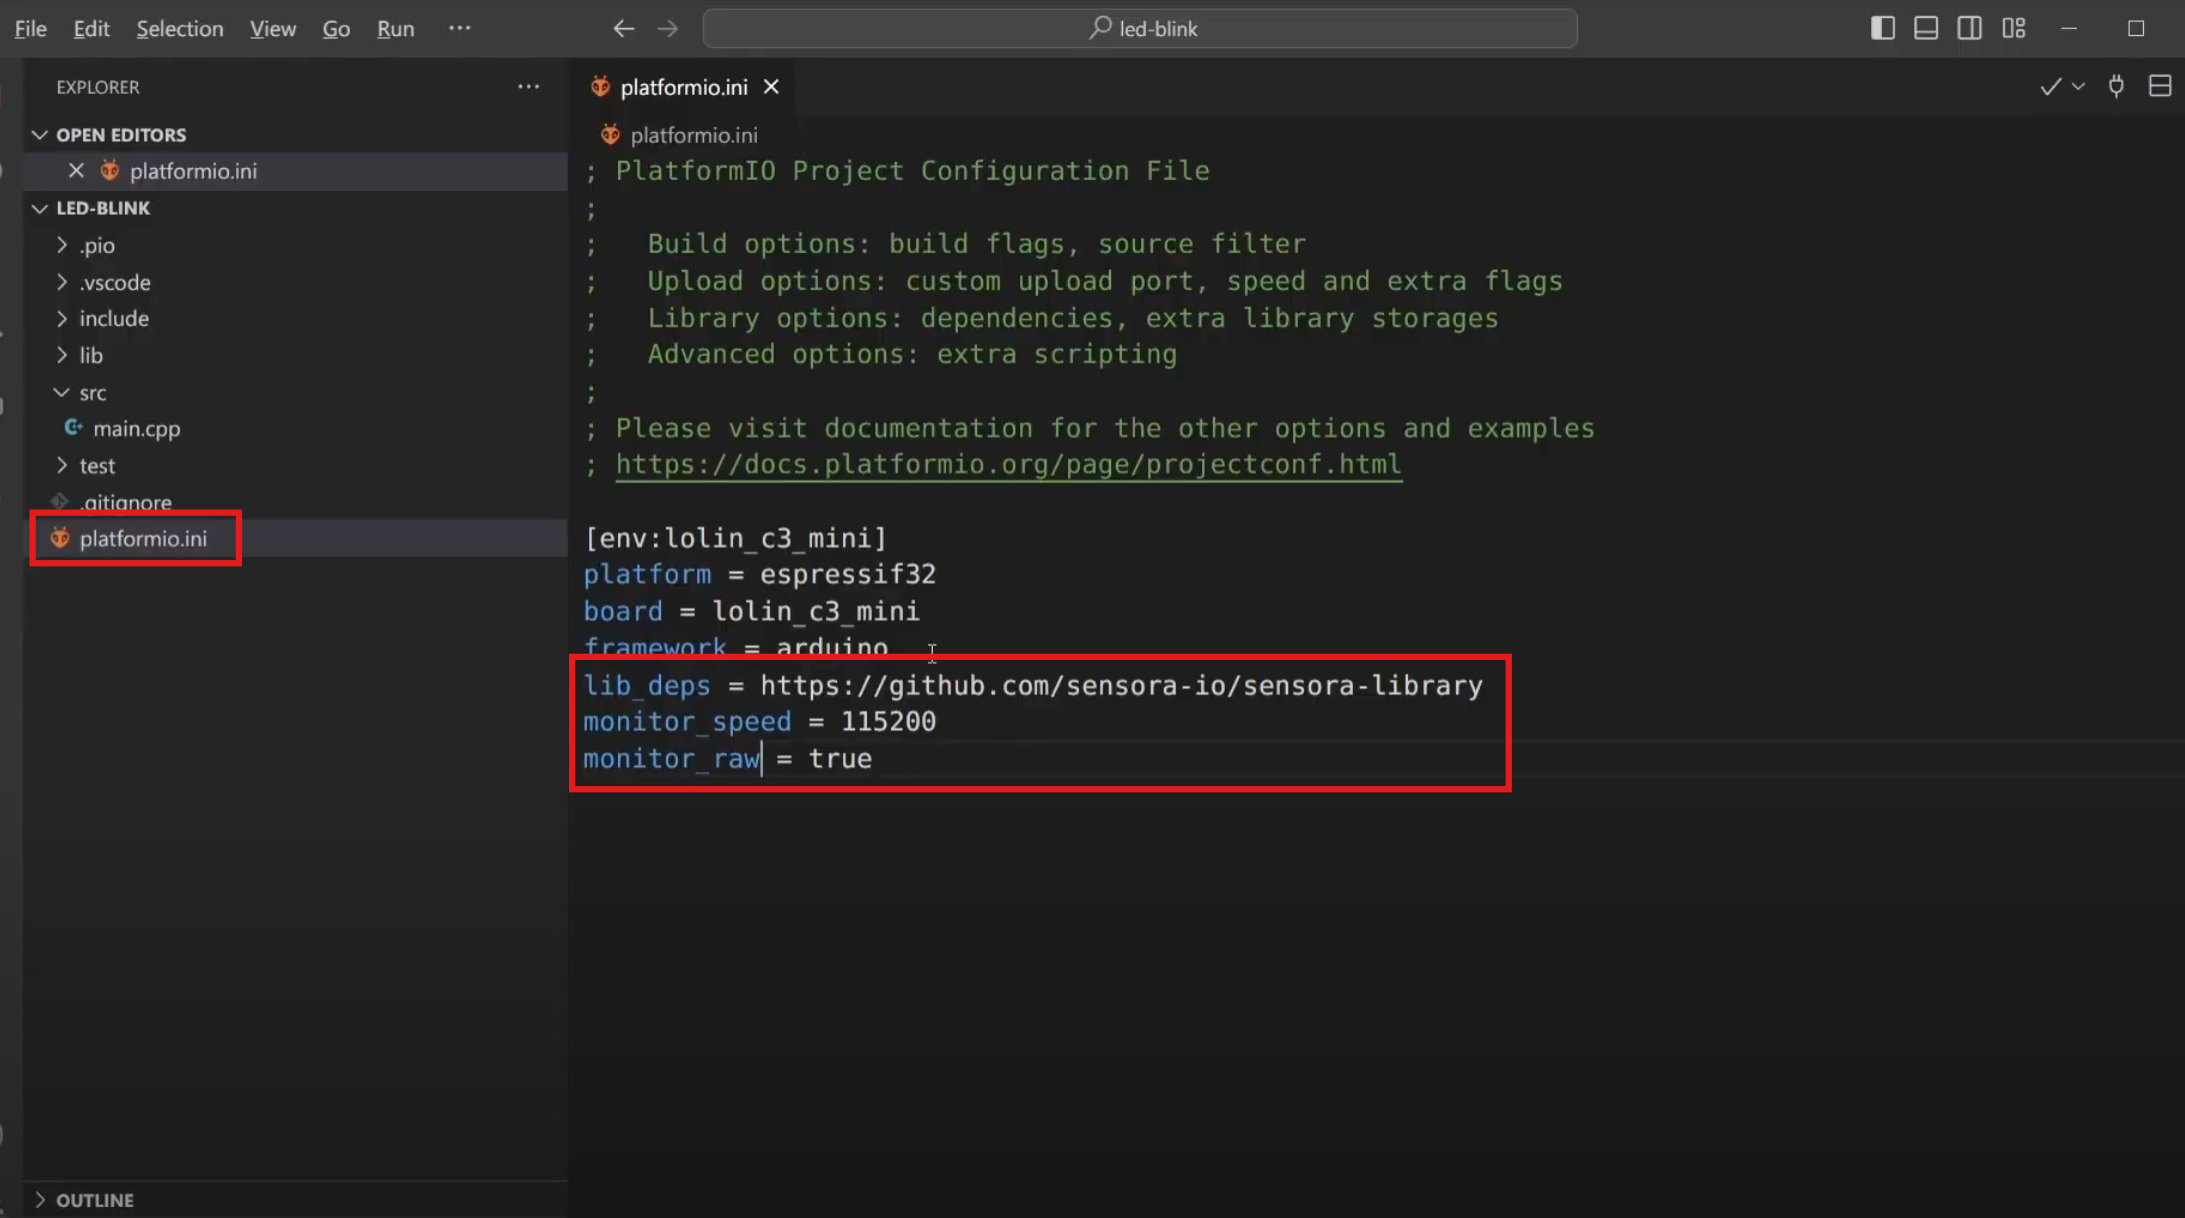
- Open
platformio.inifile - Add the following 3 lines:
lib_deps = https://github.com/sensora-io/sensora-library
monitor_speed = 115200
monitor_raw = true
Now let's jump to the fun part, coding!
LED Blink - Example code
Below you will find the example code that will turn the LED on/off based on commands received from the server. Copy and paste the code below to src/main.cpp
#include <Arduino.h>
#include <EspWifi.h>

void handleLedMessage(PropertyValue& val) {
  if (val.Bool()) {
    SENSORA_LOGI("turn ON");
    neopixelWrite(BUILTIN_LED, 0, 0, 255);
  } else {
    SENSORA_LOGI("turn OFF");
    neopixelWrite(BUILTIN_LED, 0, 0, 0);
  }
}

Property ledProperty("led");
void setup() {
  Serial.begin(115200);
  ledProperty.setDataType(DataType::Boolean)
      .setAccessMode(AccessMode::Write)
      .subscribe(handleLedMessage);

  pinMode(LED_BUILTIN, OUTPUT);
  Sensora.setup();
}

void loop() {
  Sensora.loop();
}
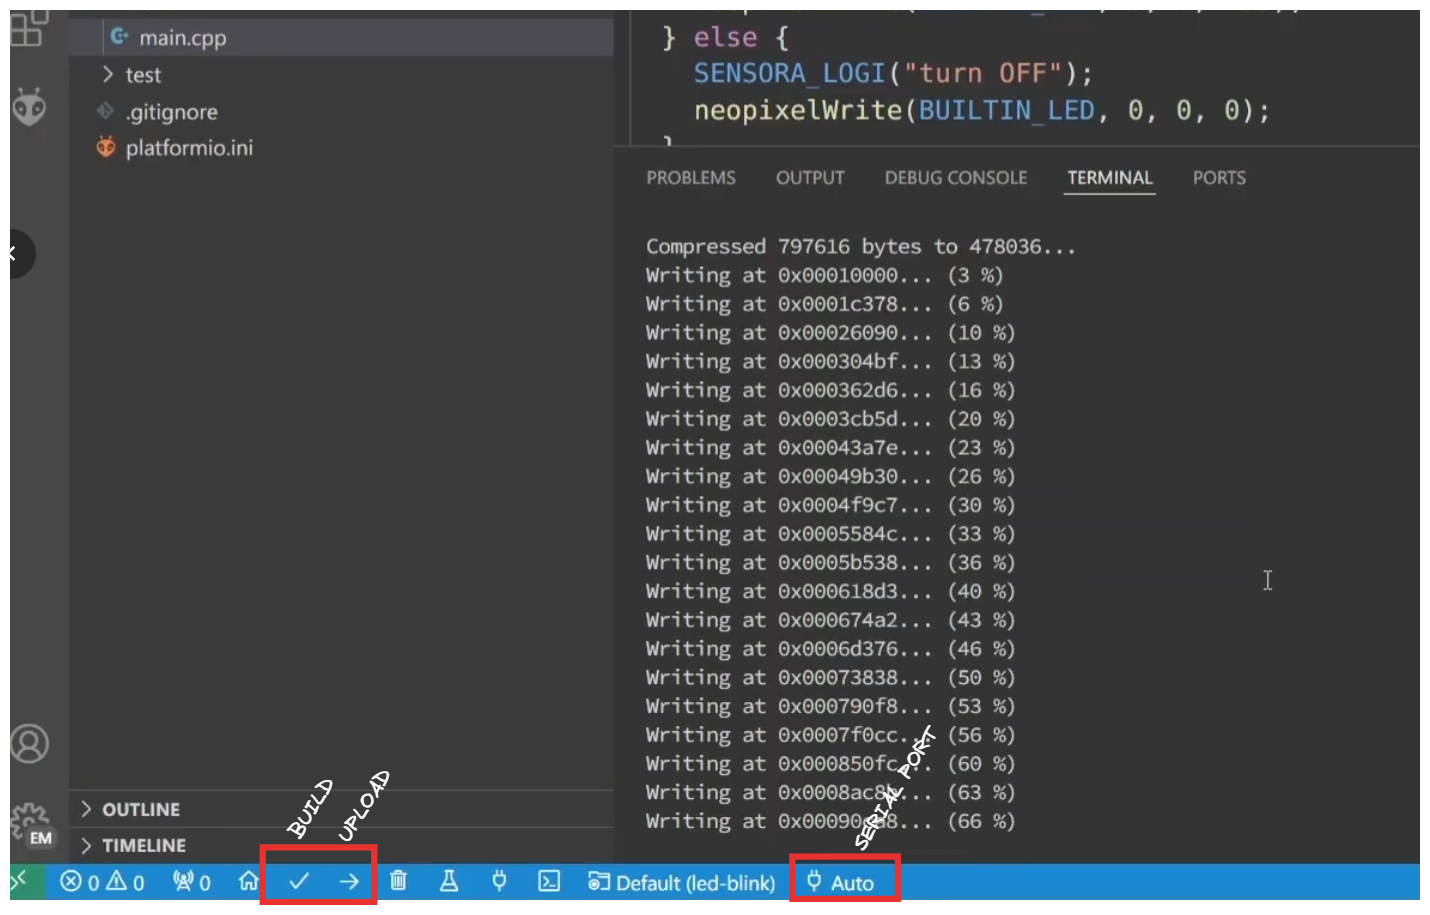
Save the file and build the project to make sure there are no errors. Once the build is correct, proceed with uploading the code to the device. Make sure device is already connected via USB-C cable with your machine.
Setup Sensora Cloud
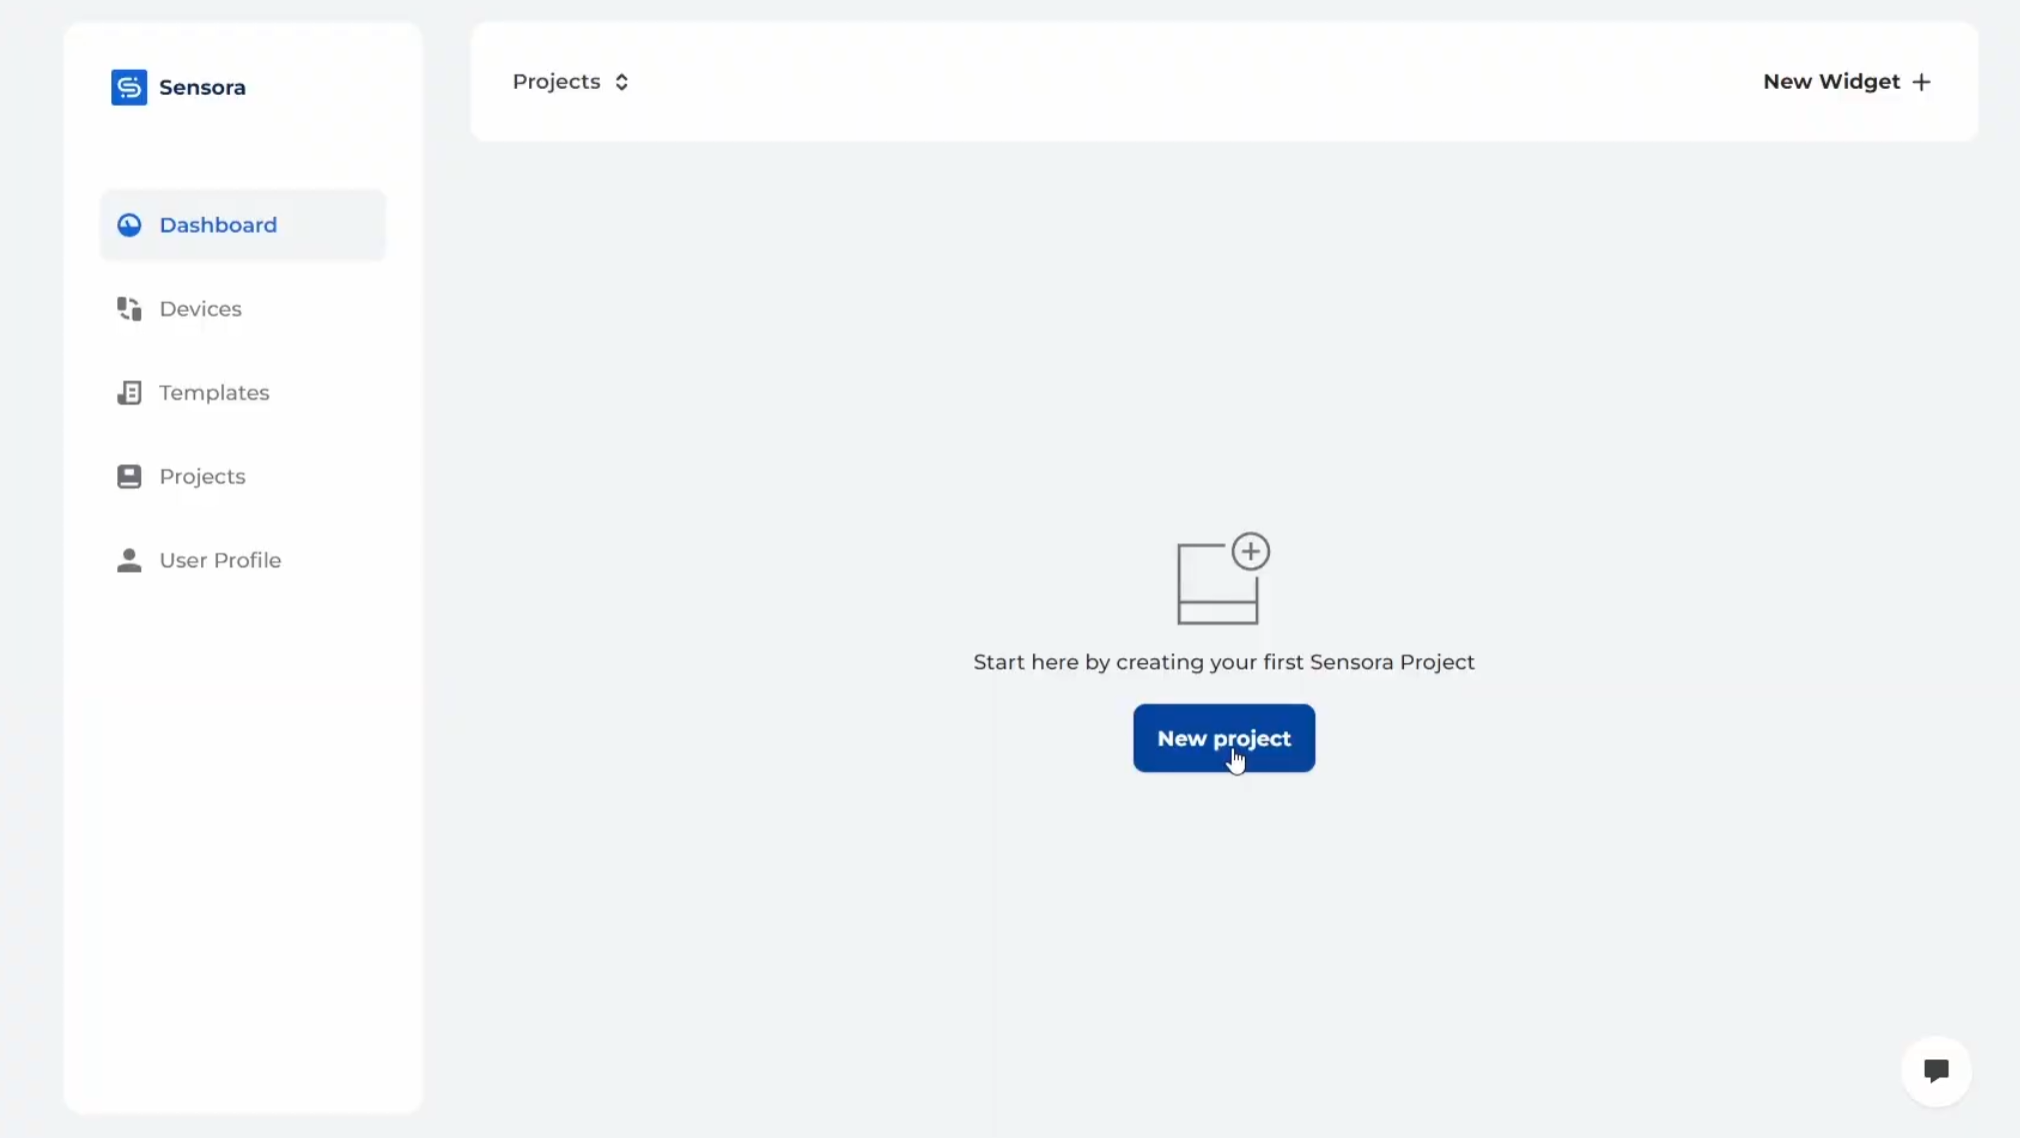
Before connecting the device to Sensora Cloud, we need to create our first IoT project. Click the button New Project and fill the required fields. After the project is created, we will create our first device template.
Add device template
Device template is a group of configurations that specify the characteristics of devices you plan to add to the project.
- Template name - specify a name that is easy to remember
- Hardware - select the board that you are using, ESP32 in our case
Create device
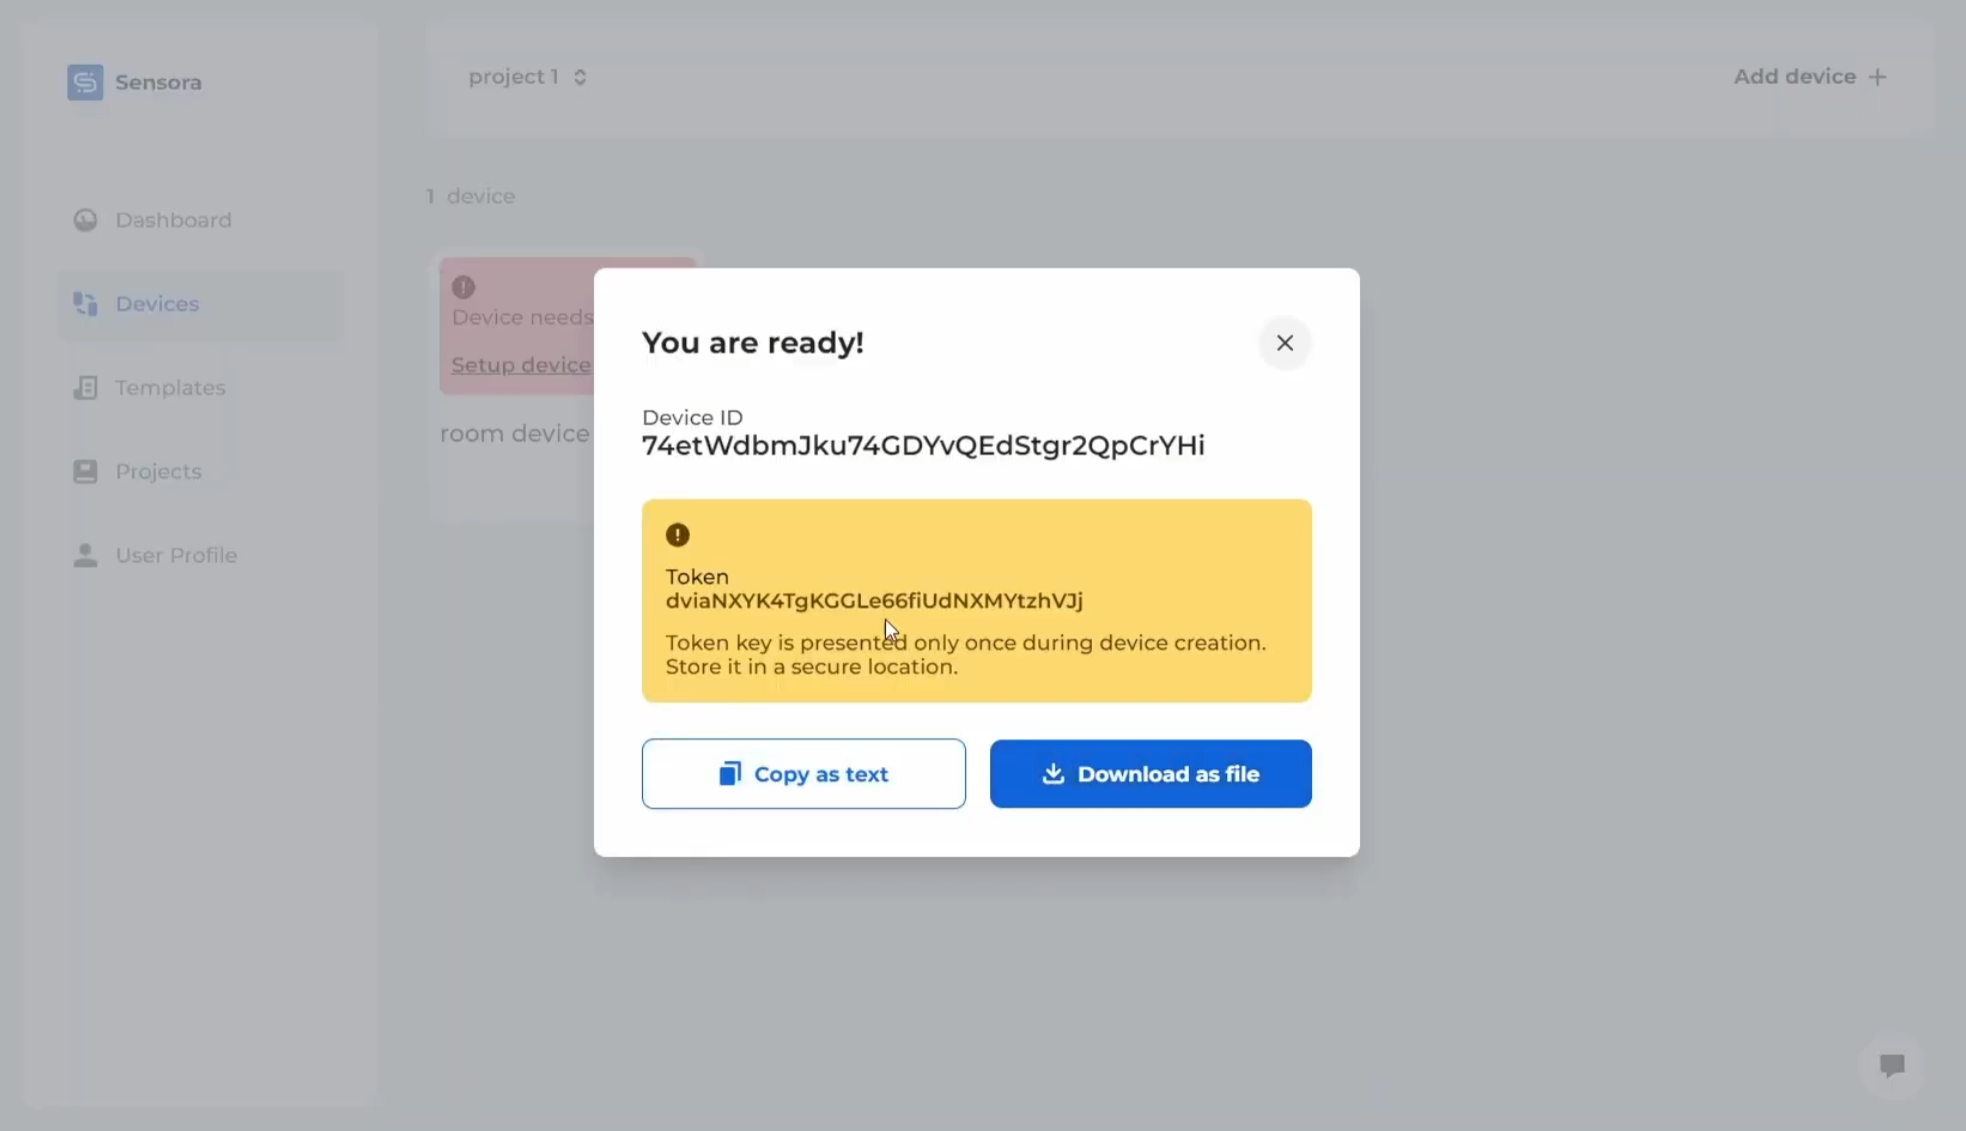
Once you click "Create Device", the credentials will be displayed on the screen.
Please note, the Device Token will only be shown once for security reasons. Ensure you copy and securely store the Device Token as you will need it to configure the device later. If the Device Token is lost, you will not be able to retrieve it and you may need to create a new device.
Device provision
Device provisioning is a crucial process that connects your hardware to the Sensora Cloud. The steps below will guide us visually through the process.
- Click Setup device to open the provision modal
- Click Connect and Serial popup will open. Select the same Serial port that the ESP32 is connected to. Confirm the selection by clicking Connect.
- Provide WiFi SSID (WiFi name) and WiFi password. Click Next and wait for connection.
- Provide Device Token that you stored before.
The screenshots included will also help guide you through each step
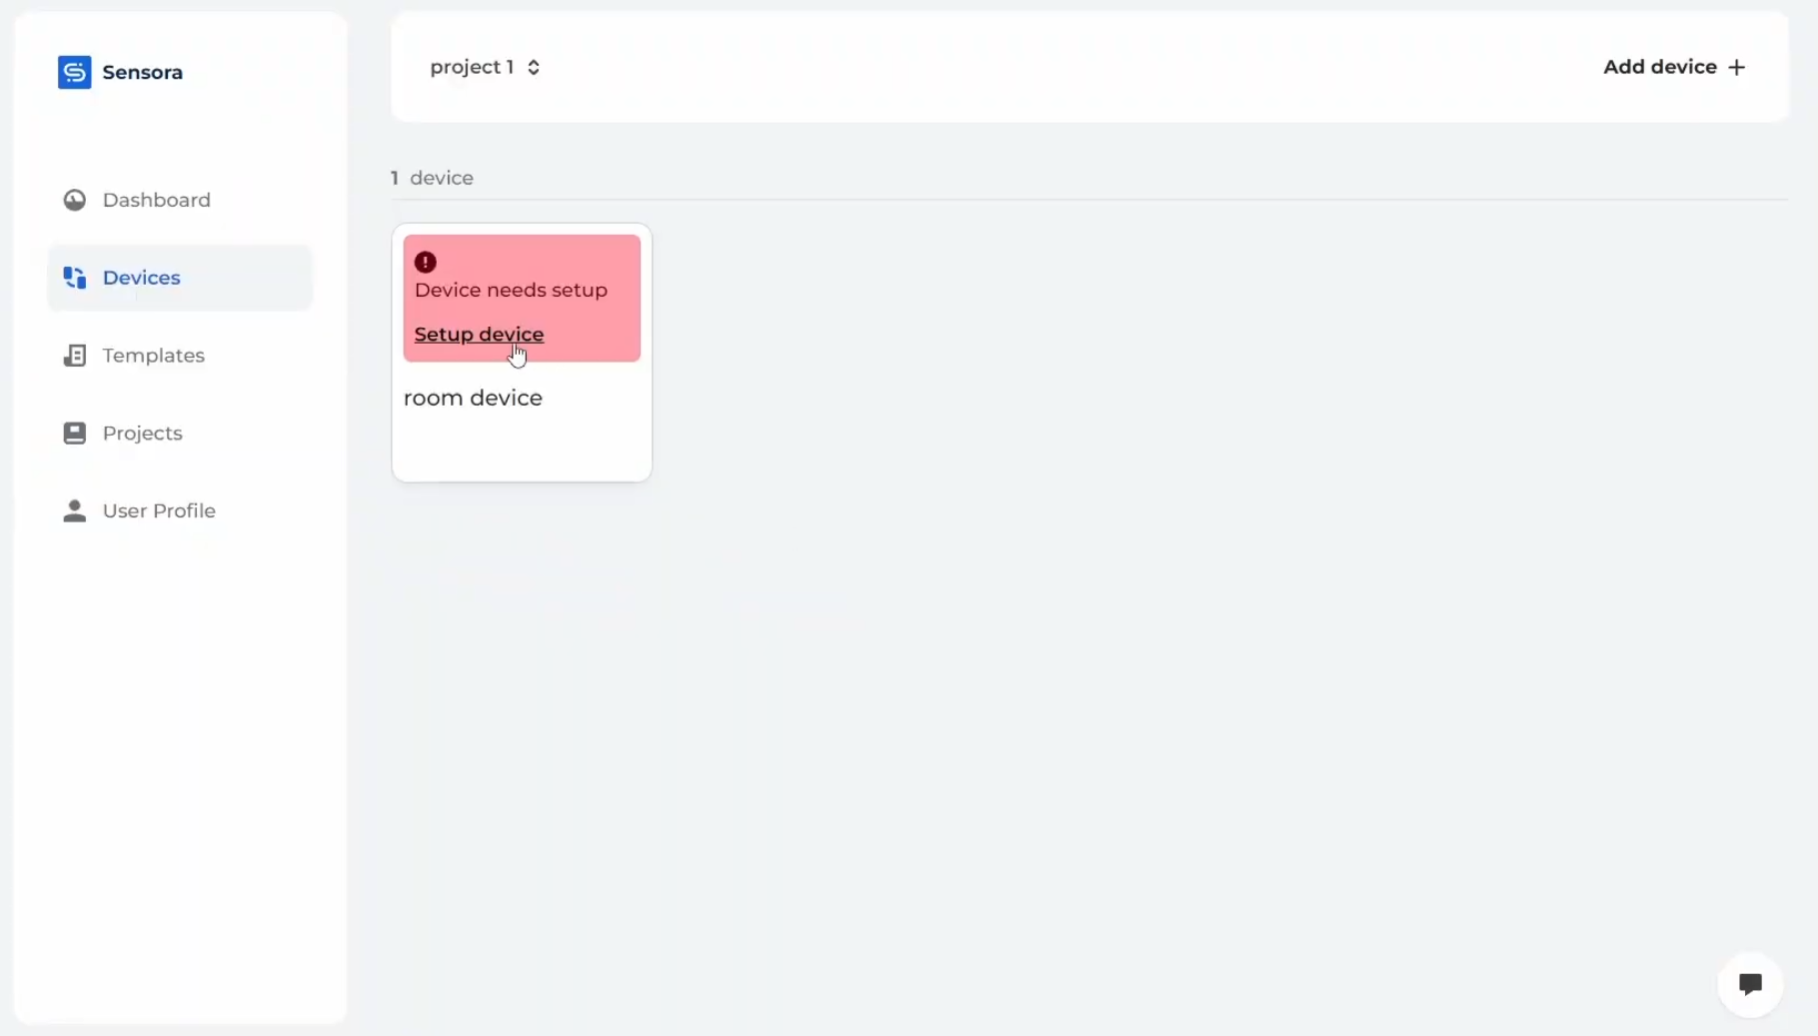
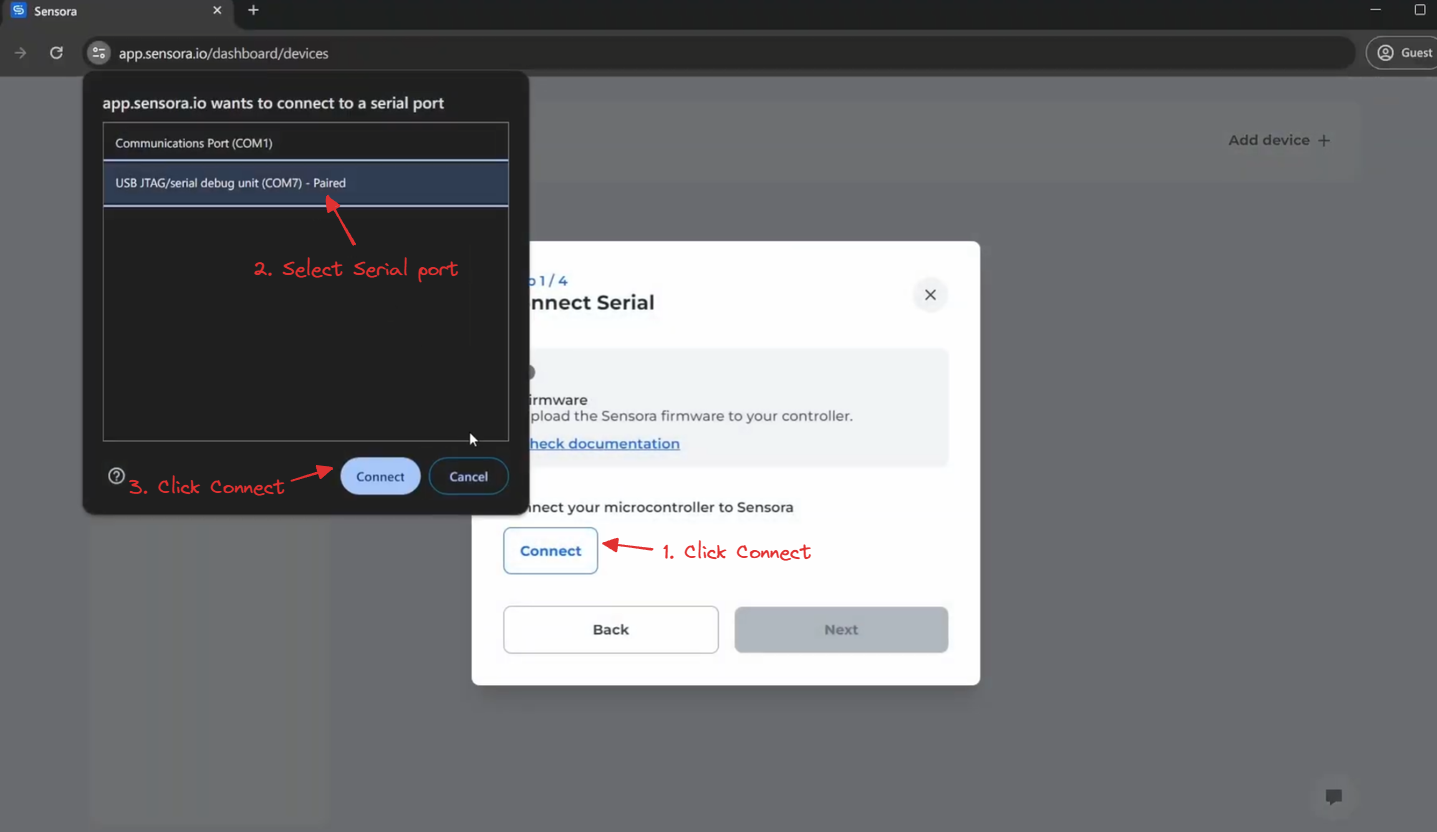
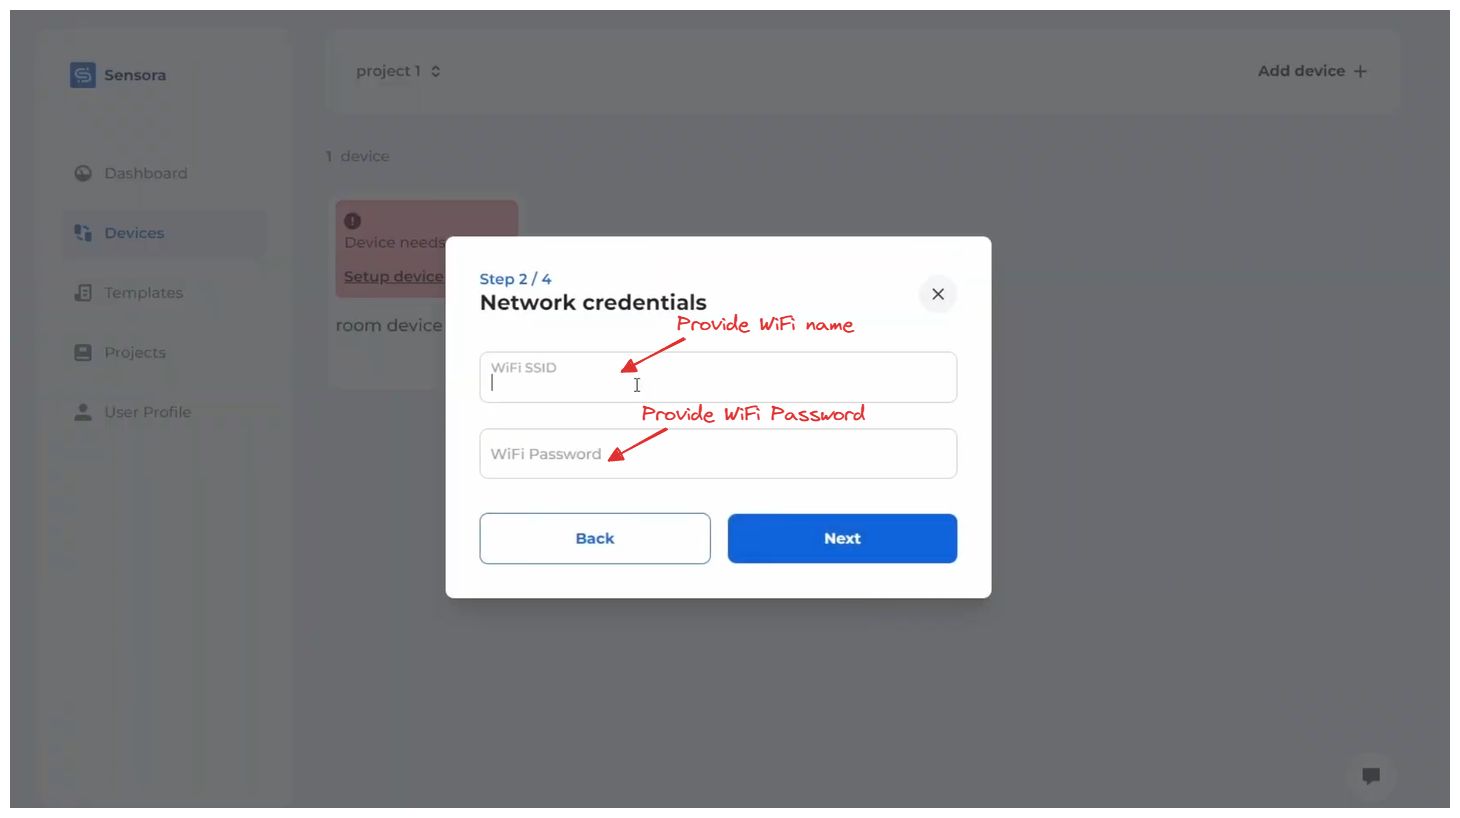
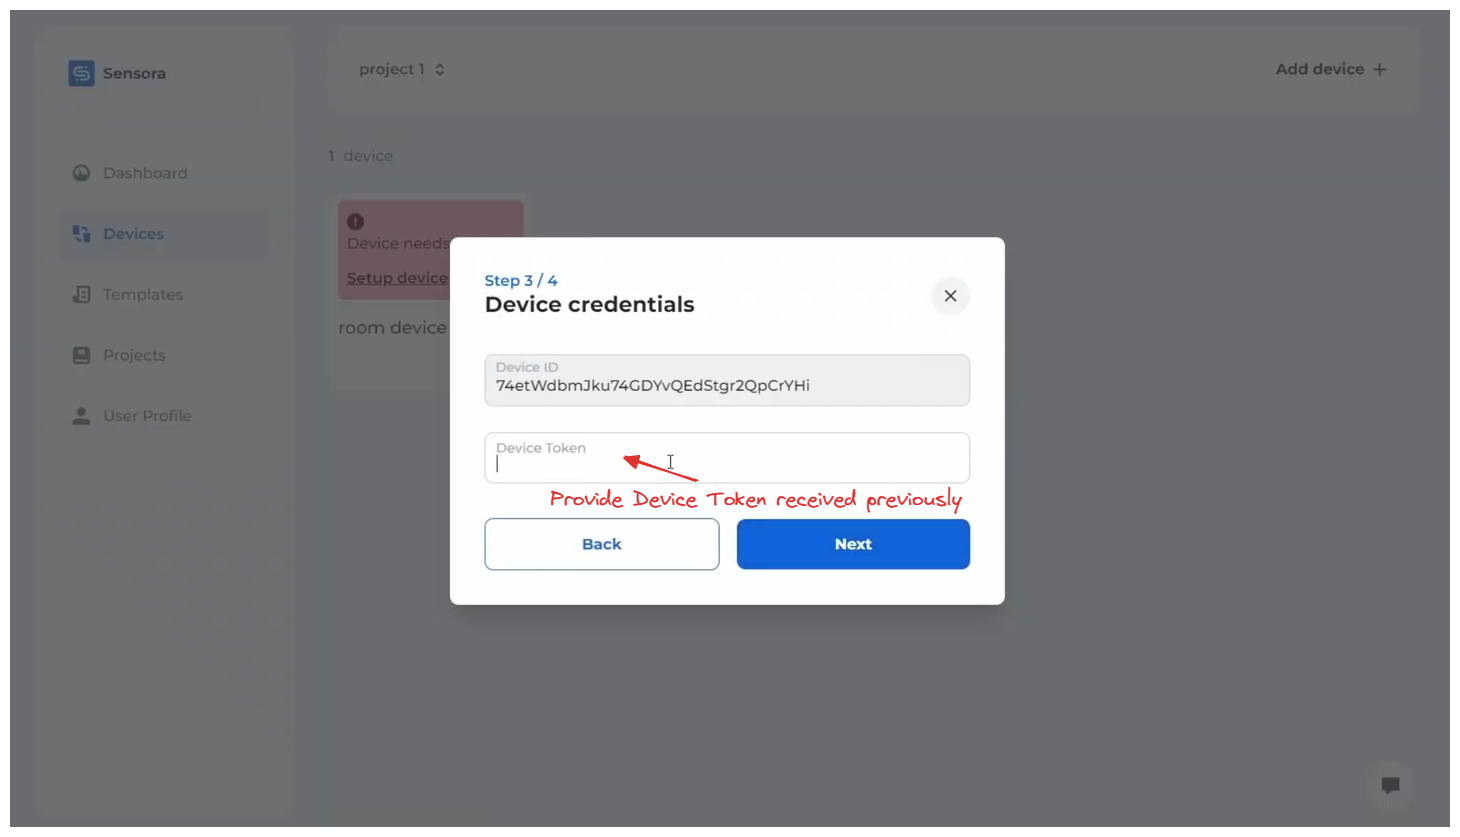
Click Next and wait until device is connected with Sensora Cloud. It can take up to 30 seconds, depending on your WiFi connection.
Create Widget
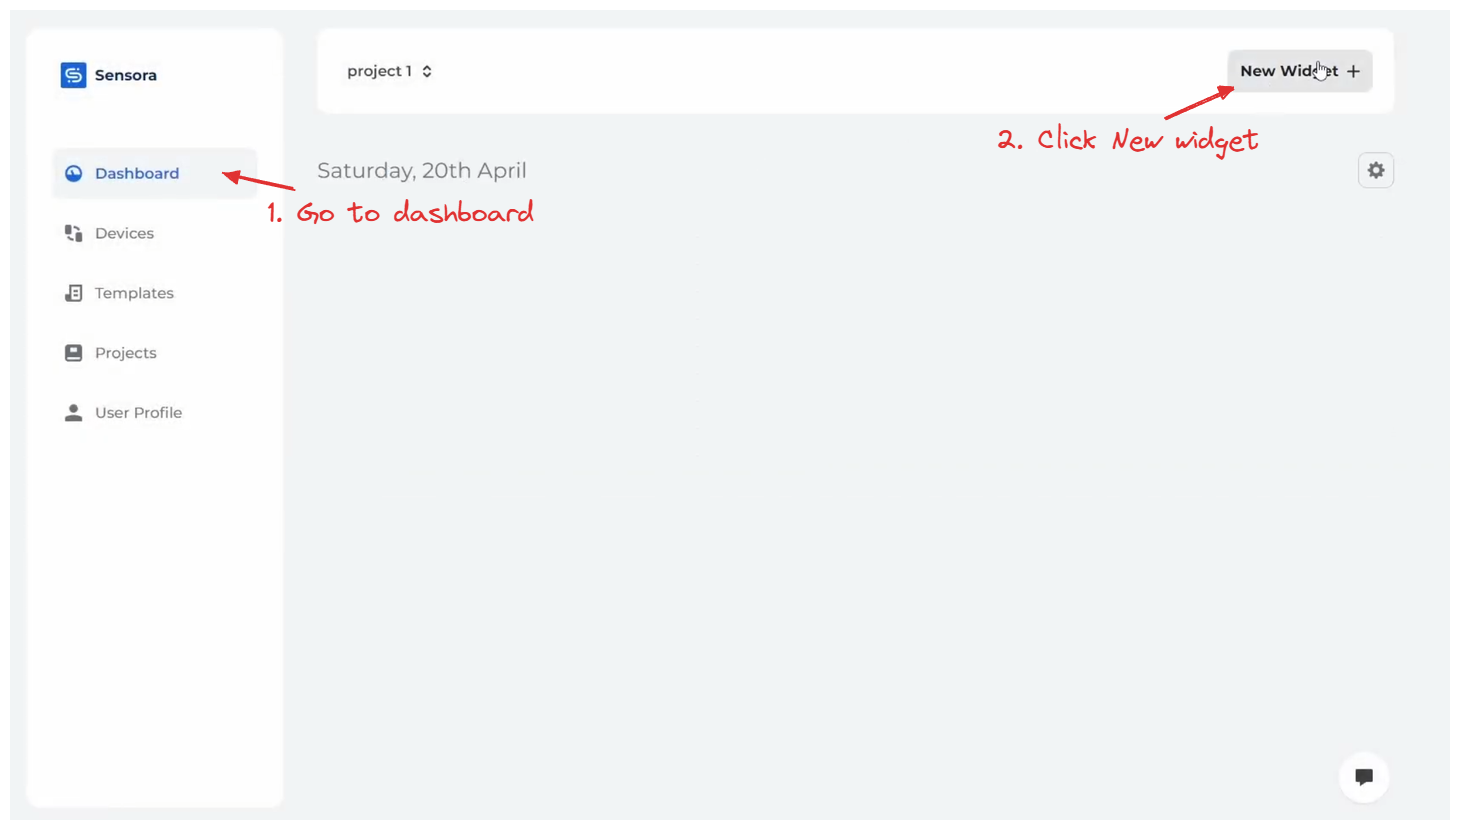
Now that our device is successfully provisioned, we will create our first widget to control the LED. We will start by going to the Dashboard menu and clicking the New Widget button, found on the right side. Since we're manually controlling the LED, we will choose the Interactive Widget option. This type of widget is ideal for direct interactions with your device's features. Here’s how we'll set it up:
- Access the Dashboard: Navigate to the Dashboard section of Sensora Cloud.
- Create a Widget: Click on the New Widget button.
- Choose the right type: Select the Interactive Widget from the available options, as this allows us to interact directly with the LED.
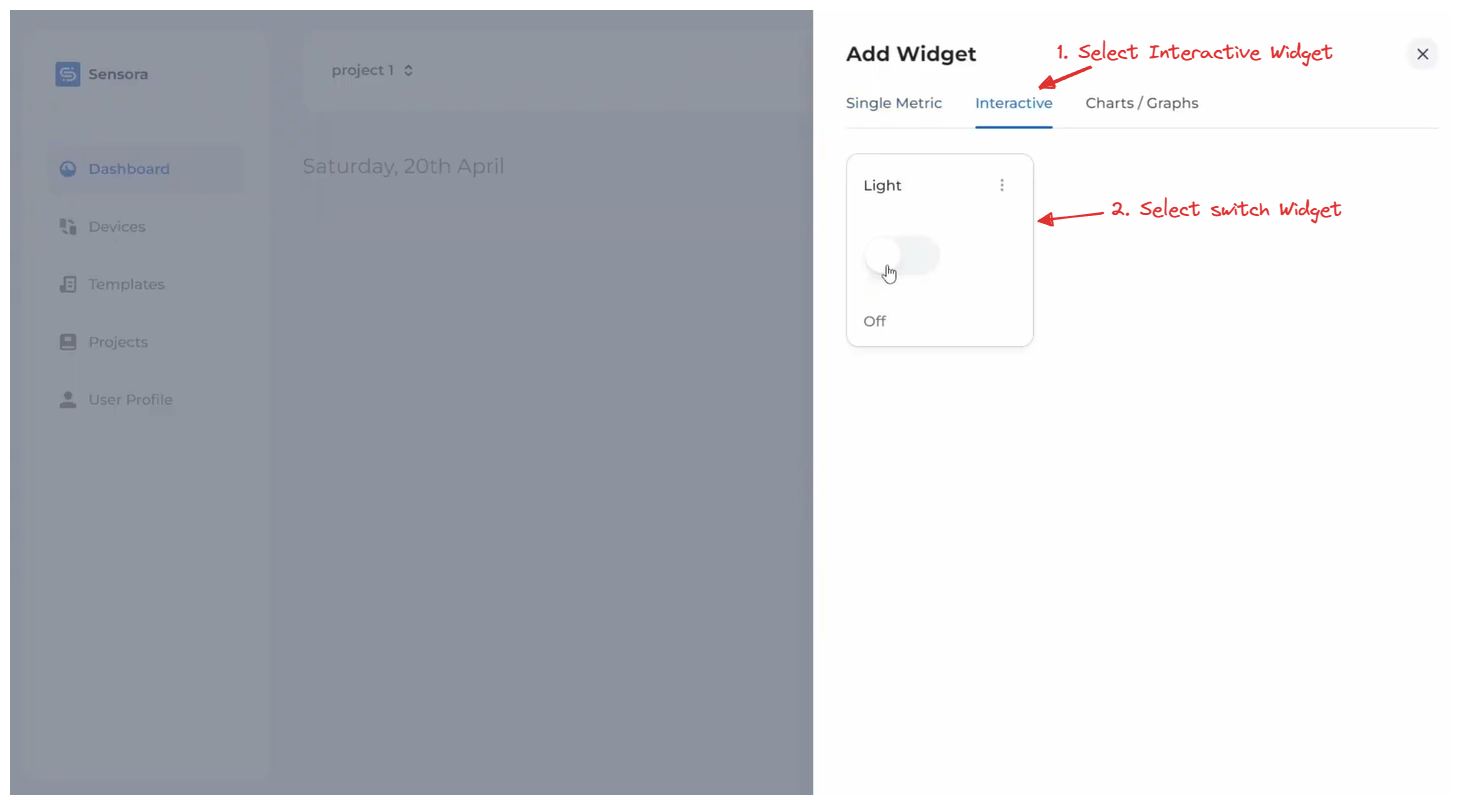
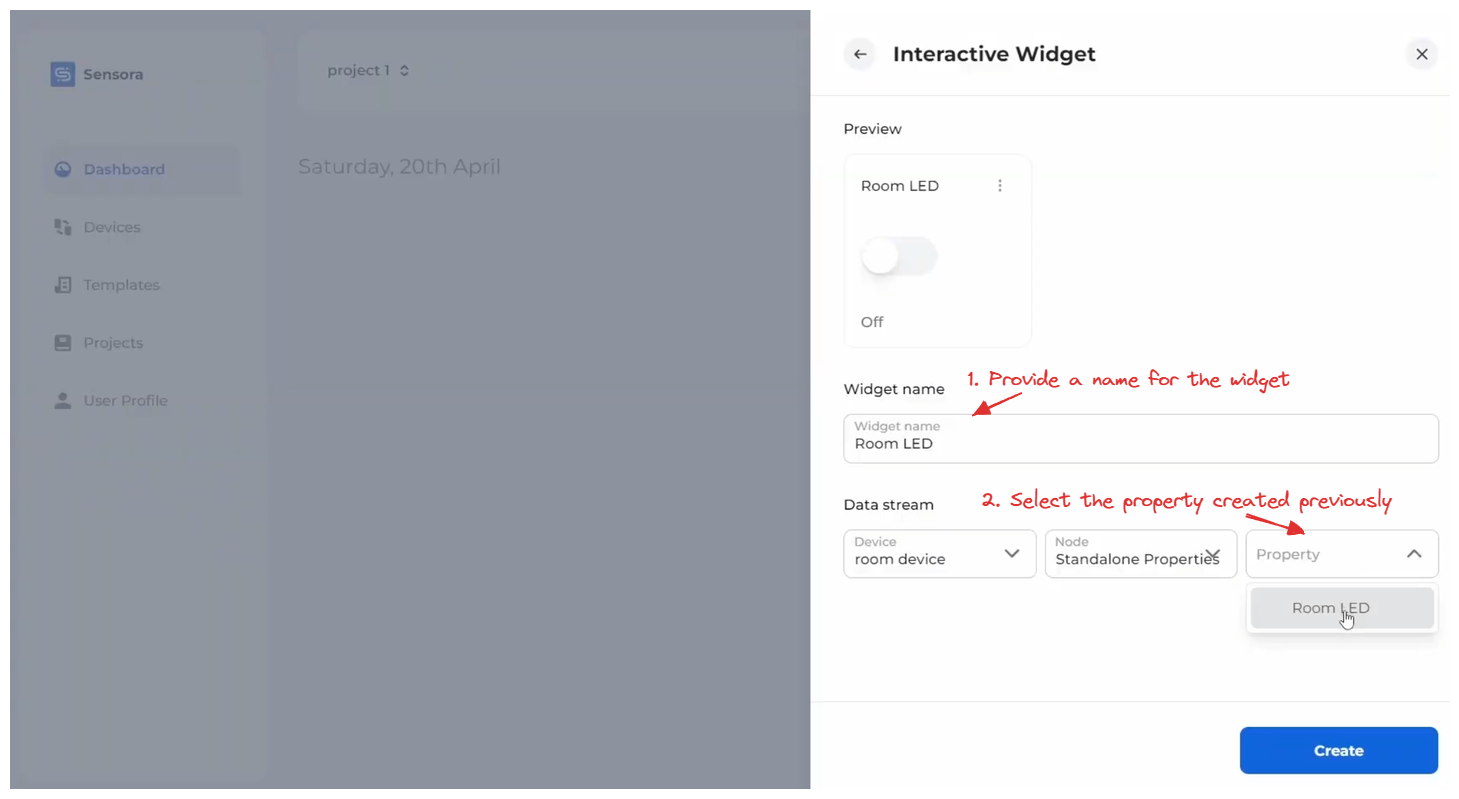
- Click Create
Congratulations!
You have successfully created your IoT project.
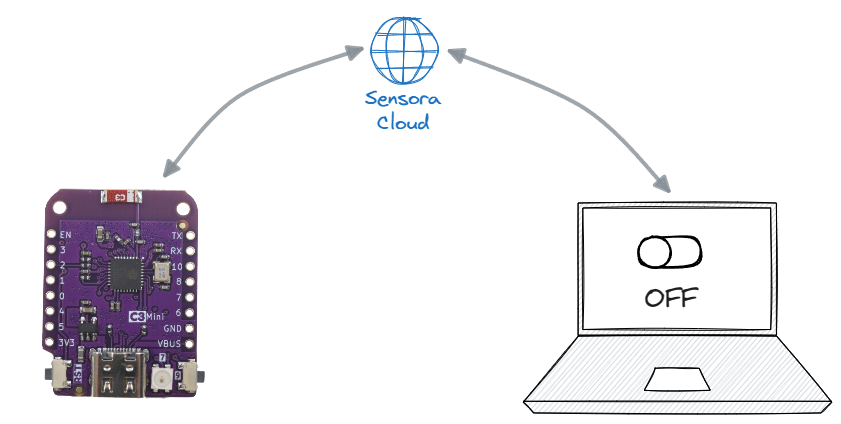
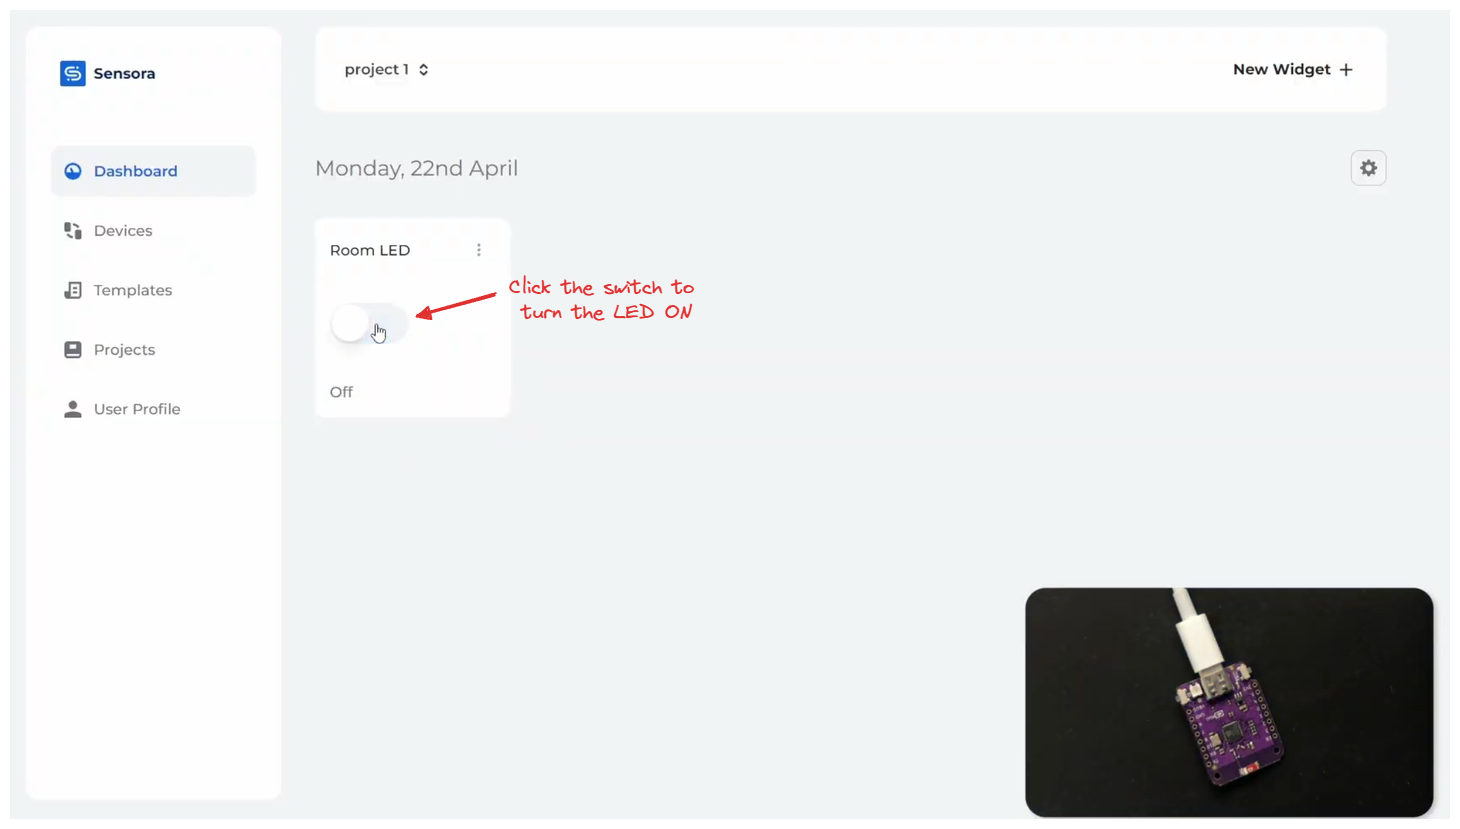
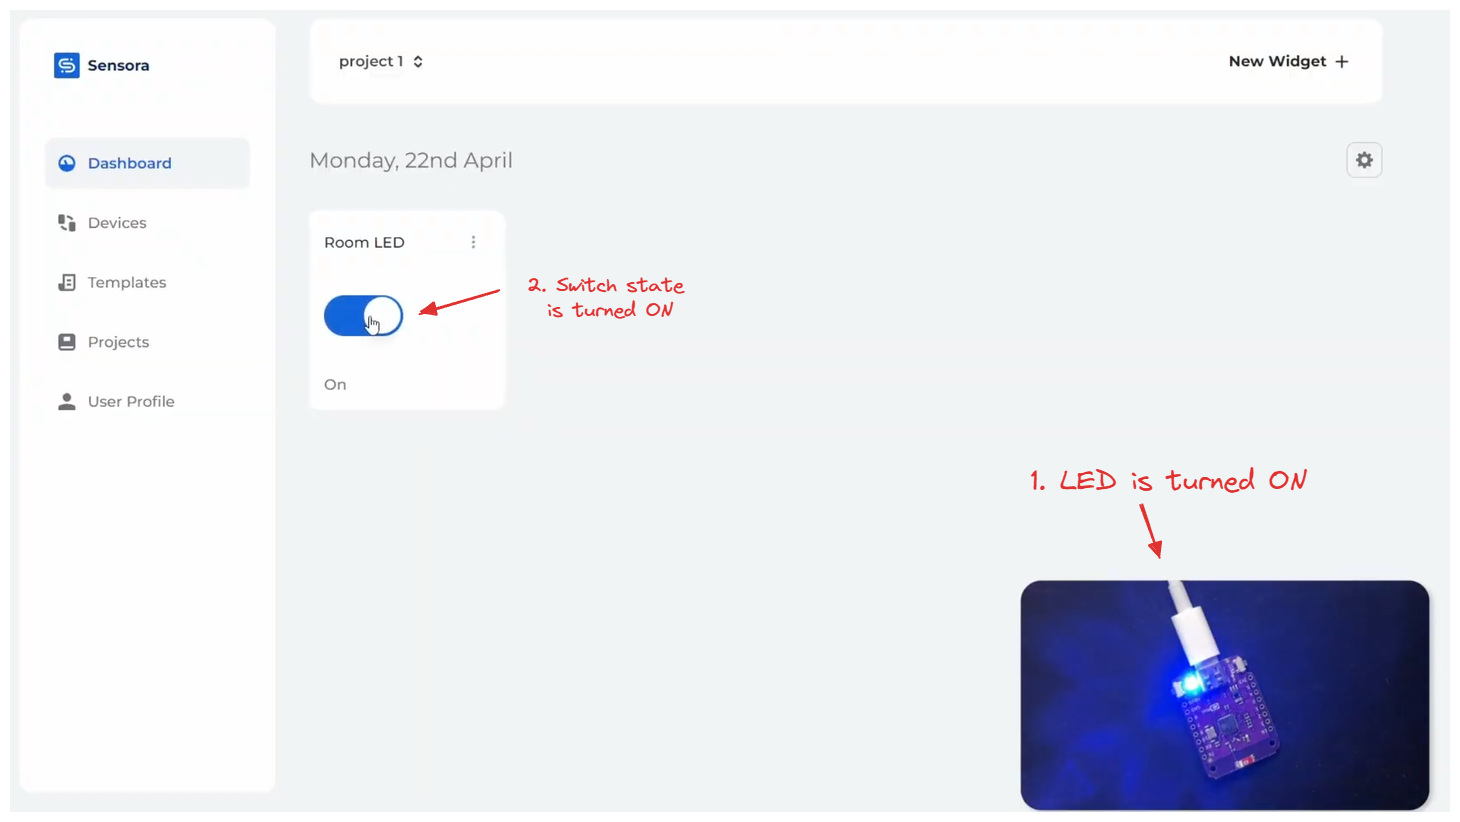
The state of the widgets is updated in real-time, showing the latest data from the associated device property.
Summary
This tutorial helps you get ready for bigger projects and encourages you to try out and learn more about electronics and programming. Have fun exploring all that this system can do!
You can also follow the video uploaded here (TODO: provide link)
- Source code: (TODO: provide link)
- Sensora Cloud Documentation
